Clearence calculation
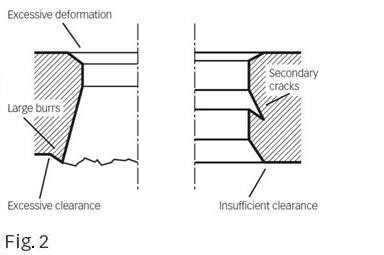
Result for excessive or insufficient clearances
Clearance between punch and die affects their life as well as the surface evenness of the sheared piece. Clearance is calculated according to material type and thickness.
A correct clearance produces (on a mild steel sheet) holes in which the upper 1/3 of the height is cylindrical and properly sheared, while the lower 2/3 are lightly conical and show tear signs (figure 1).

An inadequate clearance generates a secondary shearing effect which means additional wear on the punch. As previously said, the lack of lubrication contributes to a progressive spontaneous increase of the punch diameter and therefore to a likewise progressive and spontaneous clearance reduction.
However, an excessive clearance produces holes with intermediate tear zone and a great loss of surface evenness (see Figure 2).

On ironworkers standard clearances are used for any thickness or material, because usually, production occurs in limited series and so a compromise is accepted; it does not means that a correct use of clearance leads to a higher productivity and a lower wear on tools.
Find below a table for die clearance percentage calculations based on the thickness and common types of material to be worked. In order to obtain the best quality on finished pieces and less wear on tools, we have formulated this table based on our and our customers’ experiences.
| Material | Thickness range | Minimum or Blanking* | Standard | Maximum |
| Alluminium Copper Brass 20÷25% Kg/mm2 | Up to a mm 2 | 8% | 10% | 12% |
| From mm 2 to mm 4 | 10% | 12% | 15% |
|
| Over a mm 4 | 12% | 15% | 20% |
|
| Mild steel 30÷40% Kg/mm2 | Up to a mm 2,5 | 15% | 18% | 20% |
| From mm 2,5 to mm 5 | 18% | 22% | 25% |
|
| Over a mm 5 | 20% | 25% | 30% |
|
| Stainless steel 60÷80% Kg/mm2 | Up to a mm 1,5 | 15% | 20% | 22% |
| From mm 1,5 to mm 3 | 18% | 22% | 25% |
|
| Over a mm 3 | 20% | 25% | 28% |
|
| *Blanking: when the scrap is the requested part | ||||